Sunday, August 3, 2014

Gutter Drain Project II


The great gutter drain project... II

Where were we.. ah yes, we got the pile of rocks we needed for the well.

 
Next we just dig a hole, line it with fabric, put the rocks in with the flo well, and cover it all up.
Easy right?


It turns out the specs for the amount of run off we have call for a 7 foot deep hole with a 10 foot diameter, there are 14 tons of rocks, about 200 feet of fabric lining, and the dirt is mostly clay.


Time to bring out the big guns, neighbor Larry and his Case 580 to the rescue!


 With Larry's help we were able to get the fabric in along with 3' of rock in a few hours.


The next day I wrapped the dry flo well with fabric, and glued up pipe out to the center of the hole. Then I finished filling the hole with rock up to the flo well top edge. We were able to ditch some of the junk rock we had laying around from construction into the pit.


Another couple of loads then we folded the fabric over the well and packed dirt back into the hole. We extra care to ensure the pipe had packed support from below and all sides.


Also, in other news, for some reason day care sent my son home with an interesting hairdo.


And my Dad came over with his new toy.


Wednesday, July 23, 2014

Gutter Drain Project I


We were a little tired of having mud rivers in our backyard each time we got a down pour. So we decided to pipe the gutters underground to a dry well system. Below is the basic plan we used to figure our materials list. The pipe run extends about 100 feet from the house.


The grade in the backyard was more than sufficient to keep the pipe angle in the ditch on track without having to dig deeper as the pipe made the long run out to the dry well. We opted to solvent weld schedule 40 pvc for the system for it's strength. Should heavy equipment ever need to venture into the backyard we wanted to minimize any impact it could have on the system.

Starting on the west end of the porch we buried pipe for a downspout on the side of the house and two that are connected to the porch pillars.


From there the pipe wrapped around the stairs to meet up with the main trunk.


Lines from the east side of the porch were also tied into the main line. Portions were glued up and buried as we progressed. Many of the pipes protruding upwards in the pictures are there just to keep dirt from getting into the system while digging.


From there the run continued down the slope and away from the house. Our depth was kept a bit more than 24" below the surface.


Once we got close to the brush we made a 22.5 degree turn toward the planned dry well location.


Aiden was a bit curious about the pits developing in the yard.


On occasion Buster has chased chipmunks into some gutters we have lying behind our garage. His chipmunk chasing has resulted in him assuming there is always something hiding in any type of pipe. After hearing a shovel full of dirt hit the pipe as it was buried he frantically wanted to get at the imaginary critter. He kept barking into the pipe and clawing at the open end.


Aiden decided he also wanted to take a turn barking into the tube. 


Washed stone has arrived for phase 2.... digging and installing the dry well.


Wednesday, June 18, 2014

Pillar Topping, Lights & Skeeters


The header beam that the porch pillars support isn't quite as wide as the decorative caps at the top of the pillar. This leave about a 1/2" gap where all sorts of bugglys have decided to explore this summer. It won't be long before some mean spirited bees decide it's a great place to build a cozy home for their queen, ruining our porch time. We decided to get ahead of this problem and seal up the gap.

I decided to use some of the left over siding to make little shims that could fit inside the decorative cap then be caulked shut.

Made some relief cuts on a stack of shims to make cutting the pillar profile curve a lot easier.


Then I just mounted them in the right spot to fit up in the cap.


Here is an example of the inhabitants.


There were plenty of pillars to keep me busy for a couple of days.


The backyard is still quite destroyed.
It's about to get worse as we prep to dig trenches for the gutter drainage system.


 Also put a little time in to finish the under cabinet lighting. Jess is getting ready for canning season. I think we have about 500 jars in storage bins. I wonder if I could convince a friend of mine to fill any unused jars with delicious mead.


The mosquitos were getting quite bad at the beginning of the season so I laid down some treatment.

The wife snapped a picture of me in my mosquito elimination outfit hahaha..  what a dork... but a good misting in the appropriate areas with Nyguard IGR and Bifen I/T along with some BTI bacteria for larvicide will keep the little blood suckers at bay for the next month.


Tuesday, May 20, 2014

Chipper & Wagon Build


Evidence of the large ice storm we experienced this winter was everywhere. Twisted half-broken branches are still dangerously perched up in the trees and the ground is littered with smaller sections we tried to cut and consolidate months ago.

Fortunately, we had the family help organize the yard over Easter. We got the larger branches into manageable piles and even cleared out the front yard flower beds.

Here are some of the problem areas:


In a normal year we would gather up the brush and burn it in our fire pit. We also seem to keep adding to the large brush pile on the far side of the property. We keep telling our neighbor, "This is the year, we are getting rid of that pile!".   Yet, somehow it keeps growing...   This year we have a different tractic, we got this little guy to help out:


It's a PTO wood chipper.  Making our own chips will be a great way to replenish bedding for the flower beds and garden without having to get mulch delivered. Being a 3pt PTO piece of equipment will really help us move it around and take it to the wood rather than hauling all the branches around the yard.

Oh.. and before you ask, yes..   I have seen Fargo.


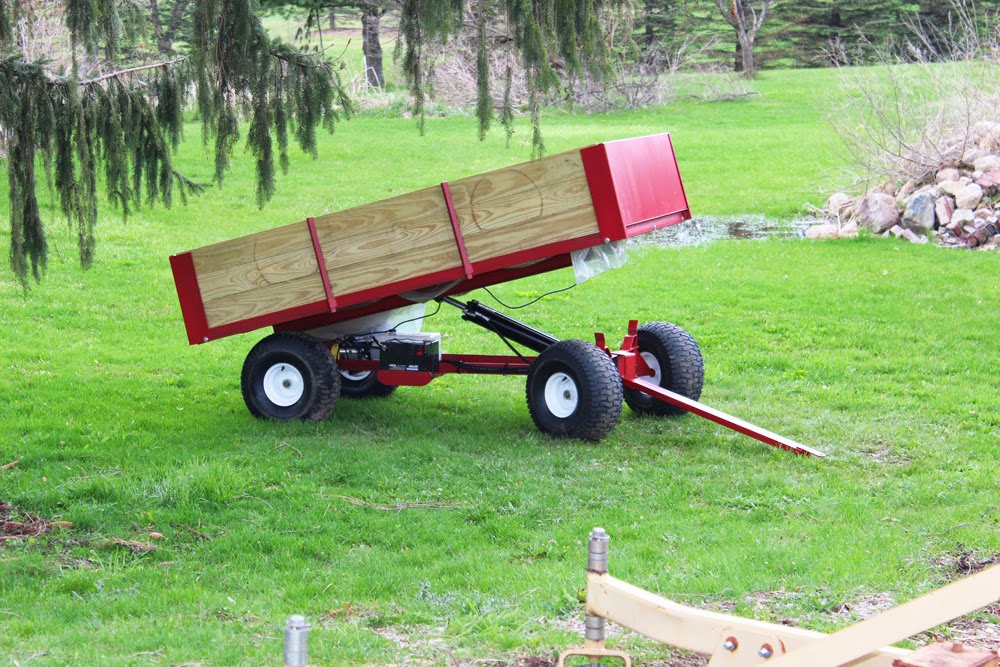
Our other recent project helps out with the product of this whole process. We've been working on a wagon style dump cart to haul the chips and get them closer to their final destination..


I opted to try a 3.5" 2500 psi hydro cylinder. The cylinder is double action but the pump is single acting. This turned out to be a mistake later on as a double acting pump would have been a bit better. The weight of the bed doesn't quite bring it down when fully extended, it needs a little help.


There weren't many options for mounting a pump and battery on the wagon as it comes so I set about welding up some supports. I found these old porch supports laying around the farm and decided to re-purpose them.


This added cross section will support the pump and reservoir. Drilled a couple of holes in the added framing to fit screws into the bottom of the pump housing. Also tied the ground strap to this location.


Next I needed to support the battery. I was out of room in the middle section of the cart so I decided to make a side carriage of sorts. 


All the connections were welded with E6011. The tractor and chain were used to hold the frame in some of the more awkward positions for welding.


 It's all in there, I think I still need to alter the configuration a bit. I'll probably flip the cylinder (rotate in position) so the hydro hoses loop around front and don't turn so sharp.


I'm also experimenting with some way to keep debris and water off the pump and battery components. I'd like some protection but I'm also afraid of trapping moisture under the bed wood.

Here it is before the final adjustment of the underbelly water protection:


To get the tractor, wagon, and chipper around the yard together I made a custom hitch. The chipper came in a metal crate, I cut up the crate and used the angle iron to fashion a hitch that clips onto the bottom frame of the chipper.


It all works together quite nicely.


With everything ready to roll I set about feeding the chipper. It worked out quite well. You can feed up to an 8" wide log into it. If you can get some of the larger branches trimmed up correctly you can feed what amounts to a small tree into this thing.

Full load after chipping a big pile that was overwhelming the fire pit.


Dumping it near the front yard flower beds. It's interesting backing up a wagon compared to a trailer.


Hydraulics handle it with no strain. Still need to find a way to keep the hydro remote up and out of the way, some sort of clip or cord holder on the side perhaps.


A nice pile for the front flower beds.